04 July 2023
What are the Benefits of Installing a First Flush Diverter on my Rainwater Tank?
Everything you need to know about keeping your tank water clean!

Are you tired of having to clean out your rainwater tanks frequently?
Sick of the cloudy water that comes out through your taps after a heavy rainfall? Wishing there was some way to keep your stored water cleaner for longer.
Hey, your frustrations are shared by many, many others who rely on rainwater. And you can afford to relax because there are ways and means to control what goes into your tank and keep your water supply as clean as what falls from the sky (well, nearly anyhow)!).
Welcome the First Flush Diverter! This nifty device is about to make clean rainwater a whole lot more achievable, allowing you to enjoy clean and healthy water all year round.
What on Earth is a First Flush Diverter?
You can think of a first flush water diverter like the Bouncer for your water tank: where a Bouncer might guard the entrance to an exclusive club and filter out the riff-raff, your first flush diverter’s job is to prevent dirt, debris, and other unwanted contaminants from making their way into your rainwater storage.
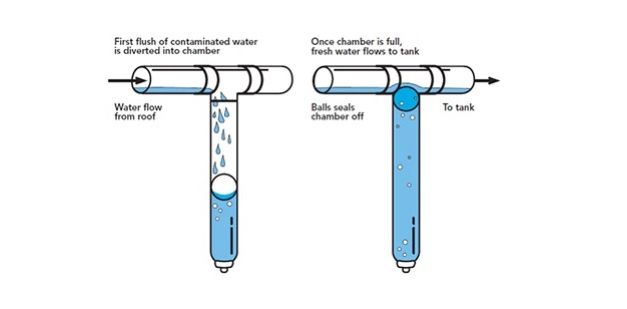
It’s not rocket science: when it rains, the first flush diverter captures and temporarily stores the first portion of the runoff. This initial flow typically contains debris, dust, and any other pollutants from the roof and gutters. As the storage chamber fills up, the floating ball or valve inside the diverter rises, closing up the entry point and diverting the subsequent cleaner water into the tank.
What are the Benefits of Having a First Flush Diverter?

Goodbye, Nasties!
The reality is that rainwater isn’t always as pure as it looks: it can collect all sorts of nasties from your roof, including leaf litter, dust and bird droppings. A first flush diverter acts as your rainwater superhero, redirecting the initial dirty water away from the tank and ensuring that only the cleanest water actually goes into storage.
Less Cleaning
Cleaning out the rainwater tank is one of those jobs that nobody loves. And by installing a first flush diverter, you can reduce your tank maintenance by a heap. By preventing the debris from entering the tank in the first place, your diverter will help to keep the water fresher for longer, and you’ll be able to enjoy longer periods between tank cleanouts.
Rainwater Conservation at Its Best
As we all know, rainwater is a precious resource, and as responsible homeowners, we must do our best to conserve it. Installing a first-flush diverter can minimize wastage and optimize your rainwater usage by ensuring that only the cleanest water fills your tank.
Can I Retrofit a First Flush Diverter to my Rainwater Tank?
In most cases, a first flush diverter can be retrofitted to a plastic water tank. They are typically designed to be easily installed in the existing rainwater collection system and can be connected using standard plumbing fittings or adapters, depending on the specific design of the diverter and the tank.
It is important to ensure that your diverter and tank are compatible before you make your purchase and to follow the manufacturer’s instructions for correct installation. To ensure a successful retrofit, we recommend that you seek advice from one of the tank specialists at Orion Australia.

What are the Cons of Installing a First Flush Diverter?
Initial Outlay
Yes, your first flush diverter will come with a cost. And while this mightn’t break the bank, it’s still an additional expense. However, keep in mind that this investment is guaranteed to pay itself off in the long run by improving your water quality and reducing the amount of tank maintenance required.
Space Requirement
Depending on the type of first flush diverter you choose, it may require additional space for installation. However, various compact design options are available that take up minimal space and fit neatly into your rainwater harvesting system. Talk to the team at Orion Australia about the best option for your setup.
What Else Can I Do to Keep My Rainwater Clean?
To ensure that the water in your rainwater tank remains clean and of high quality, here are 5 simple steps to follow:
Regularly Clean your Gutters and Roof
Keep your gutters and roof surfaces clean and free of debris, leaf matter and other pollutants. Regularly remove any buildup that could wash into your rainwater collection system during rainfall.
Use Leaf Strainers and Filters
Install leaf strainers and/or gutter guards to prevent leaves, twigs and other larger debris from entering your gutters and downpipes. Clean these filters regularly.
Regular Tank Maintenance
Regularly inspect and maintain your rainwater tank. Clean the tank when necessary, removing any sediment or sludge that may accumulate over time. Ensure that the tank is properly sealed to prevent the entry of pests or contaminants.
Keep Your Bushes and Trees Trimmed
Remove overhanging branches above your tank - preventing leaf litter from falling on the roof will help to reduce the amount of debris that lands in the catchment area or into the tank itself.
Test Water Quality
Use a DIY water testing kit to periodically test the quality of the water inside your tank. This will allow you to detect any potential issues such as microbial contamination, chemical pollutants, or pH imbalances, and take the appropriate correctional measures.
Want to know more about keeping the water in your rainwater tanks clean? Talk to one of the specialists at Orion Products on 1800 752 784 or flick us a message here and we'll be in touch soon.


